After what feels like ages (seriously, sorry for the wait), we’re back with Part 2 of this epic guide to crafting a professional macOS configuration. This time, we’re diving into the must-have system and developer tools. Let’s geek out!
Terminal application
For developers, the terminal is a second home—where projects come to life (and occasionally crash spectacularly). Sure, macOS comes with Terminal.app, but why settle for good when you can have great? Here’s a list of power-packed alternatives to level up your terminal game:
I’m partial to Warp and iTerm2, but every option here has its perks. Currently, Warp has my heart—it’s sleek, ridiculously fast, and fully customizable (with just a bit of elbow grease).
Warp configuration
First things first—choose a theme. Head over to Settings > Appearance > Themes and pick your favorite. I swear by the snazzy. If you’re using iTerm2, grab snazzy for iTerm too. Matchy-matchy is cool, right?
Single-Line Prompt? Yes, please. Warp now supports a single-line prompt—finally! (Check out this blog post for a behind-the-scenes look at why this “simple” feature took months to implement.)
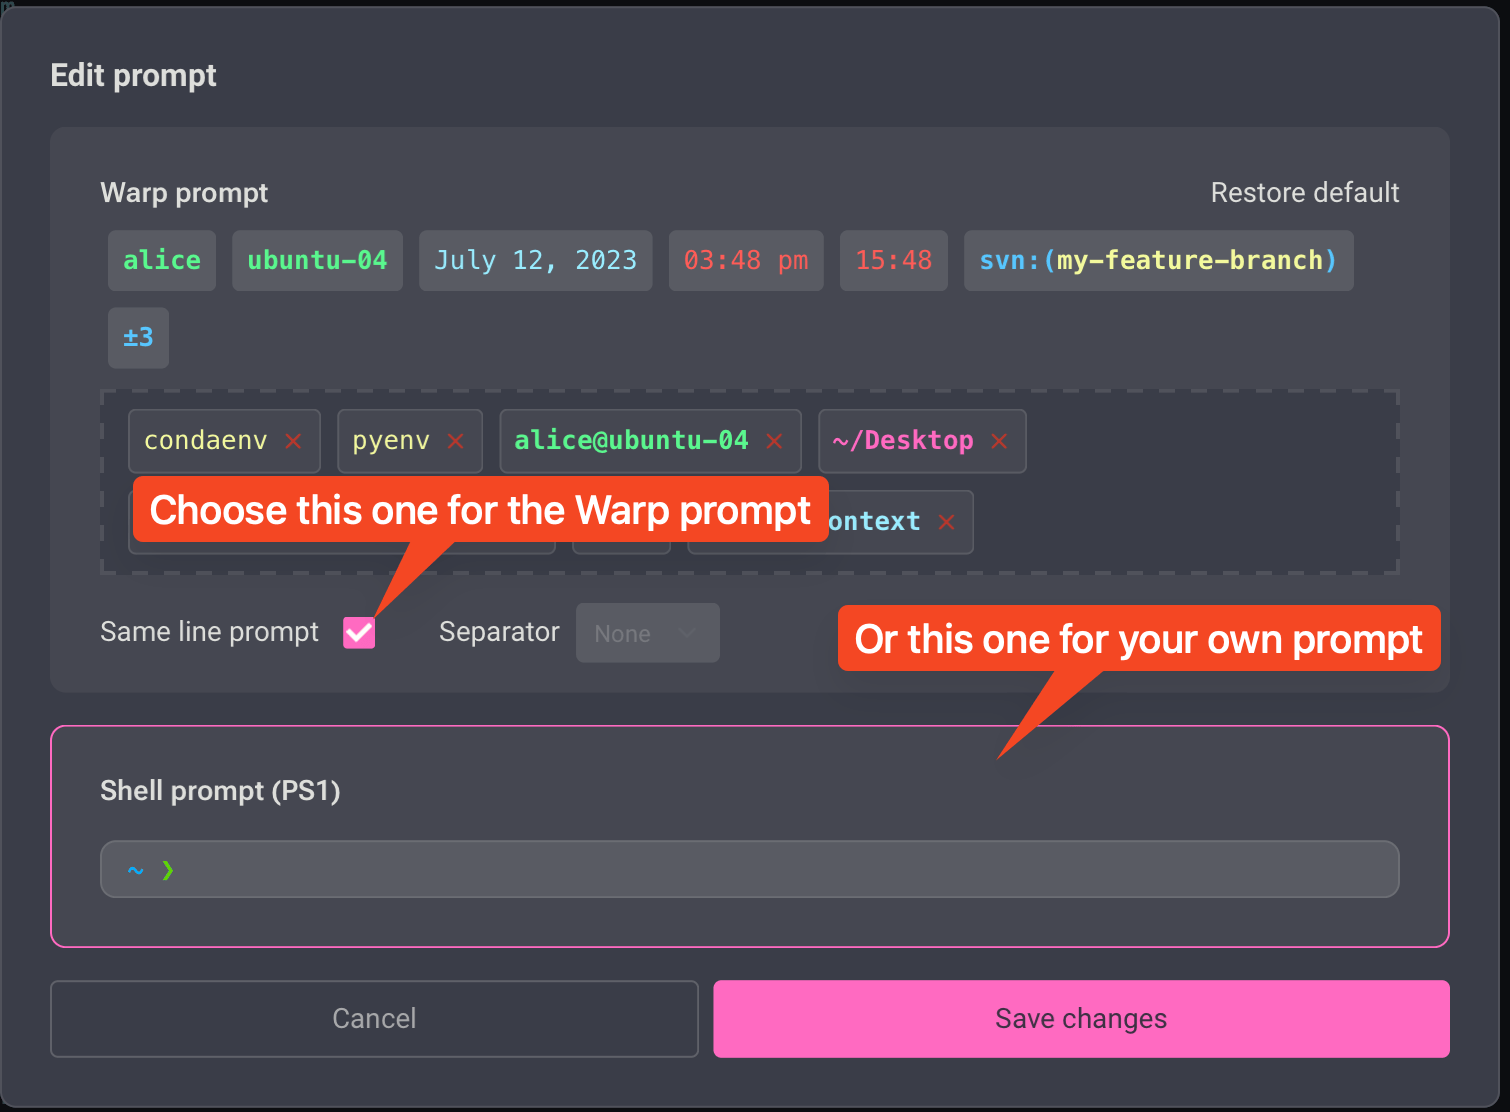
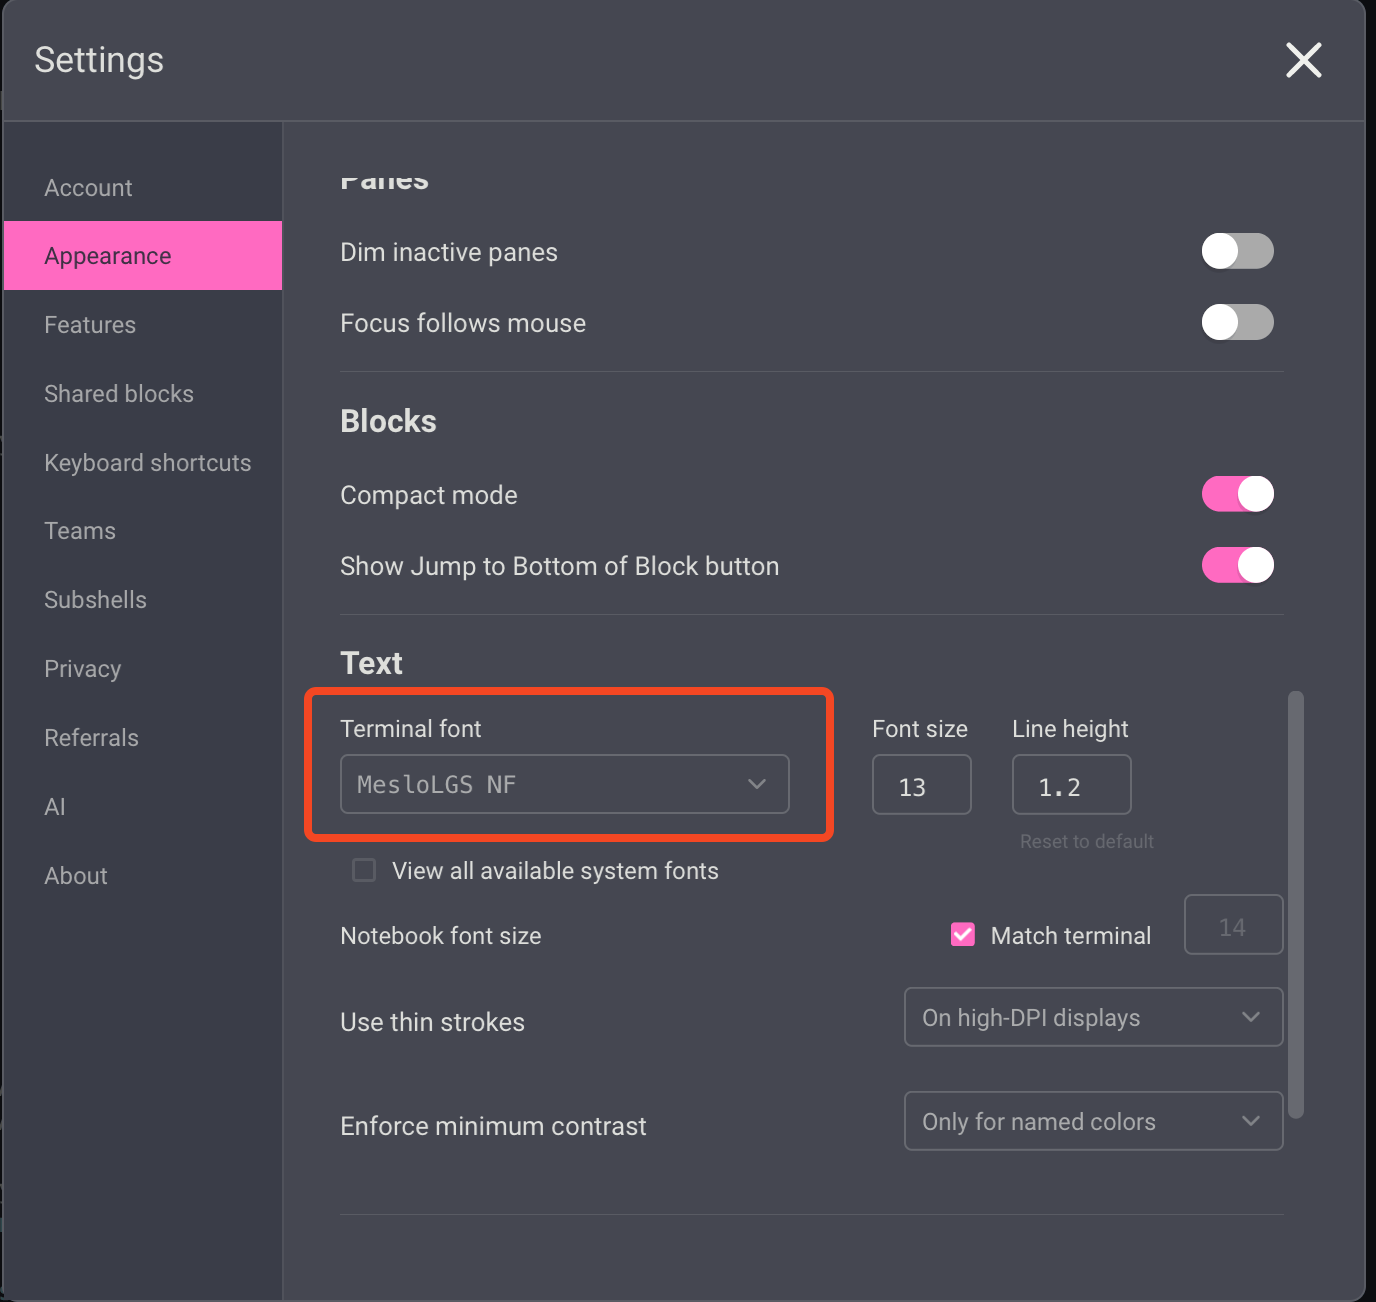
To fully enjoy modern shell themes (like the upcoming powerlevel10k), set the font to MesloLGS NF. Don’t worry, this font will be installed automatically later.
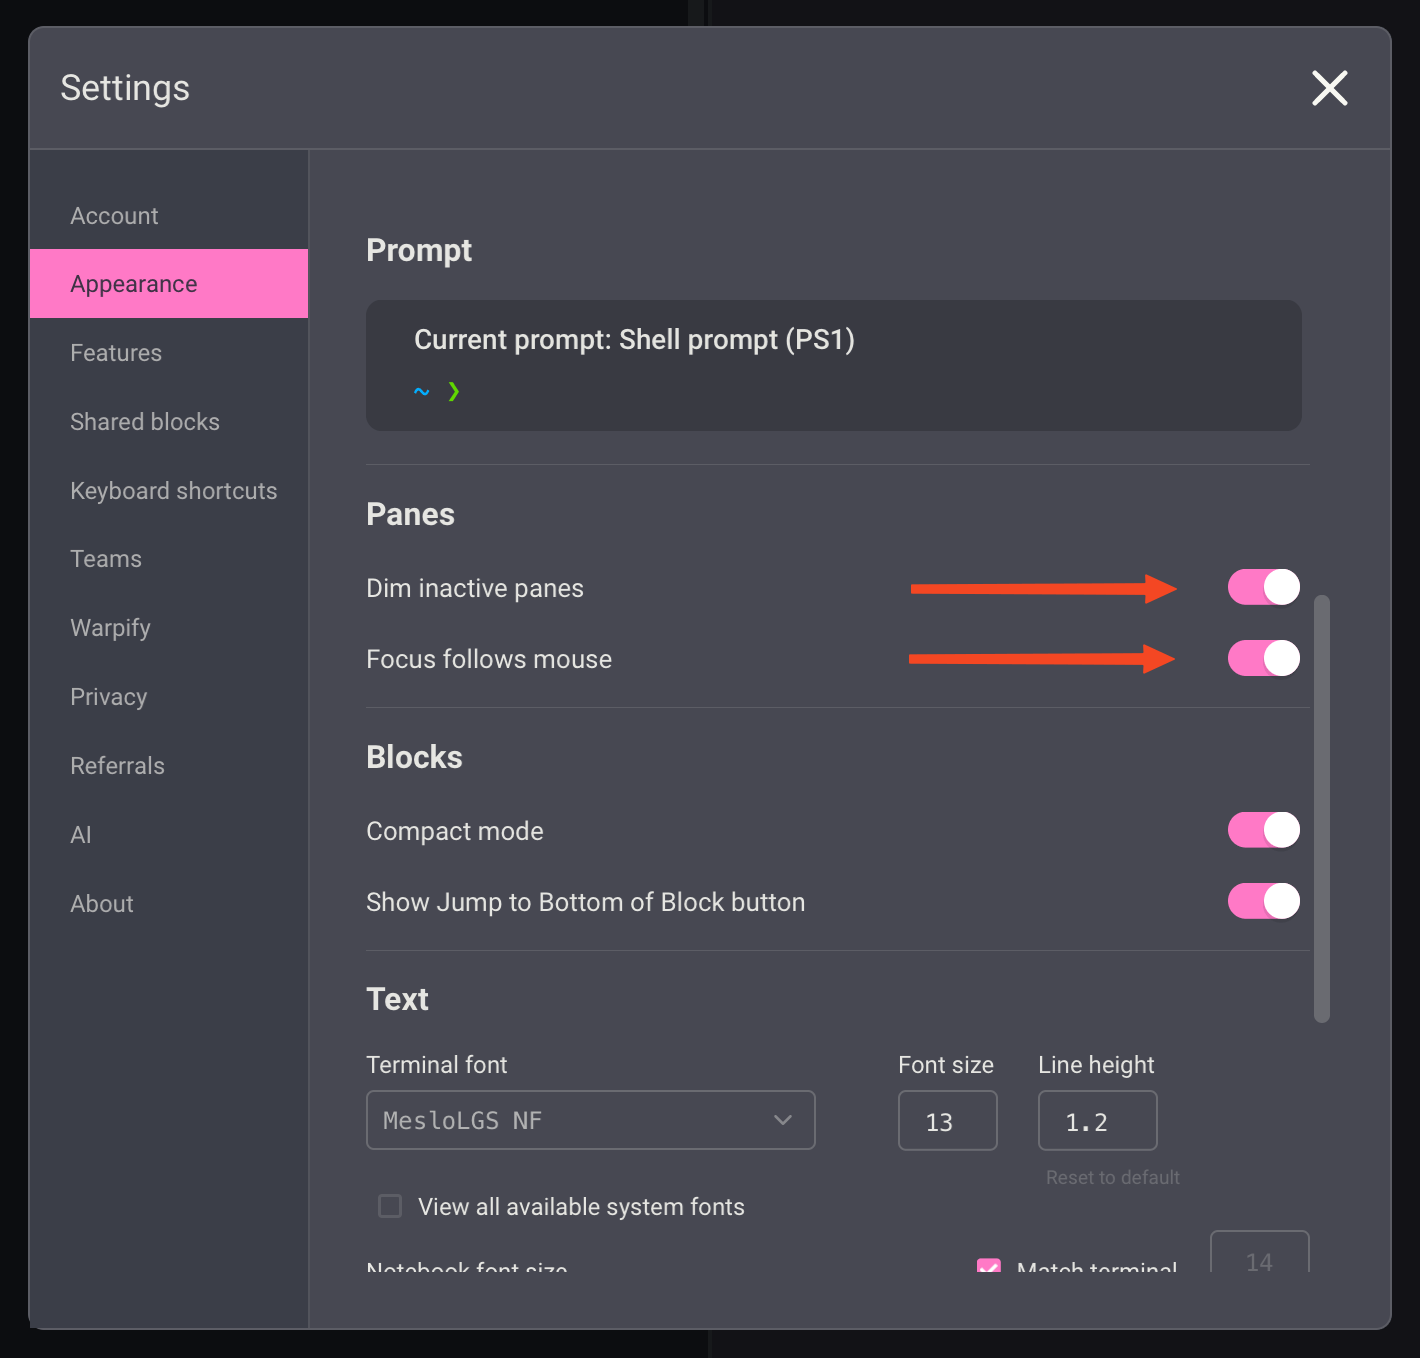
Another useful thing is to dim inactive panes and to follow the cursor. If you have a tab which is diveded to several panes (this can be done via cmd+d to split right or cmd+shift+d to split down) - just move your cursor over the pane to make it active.
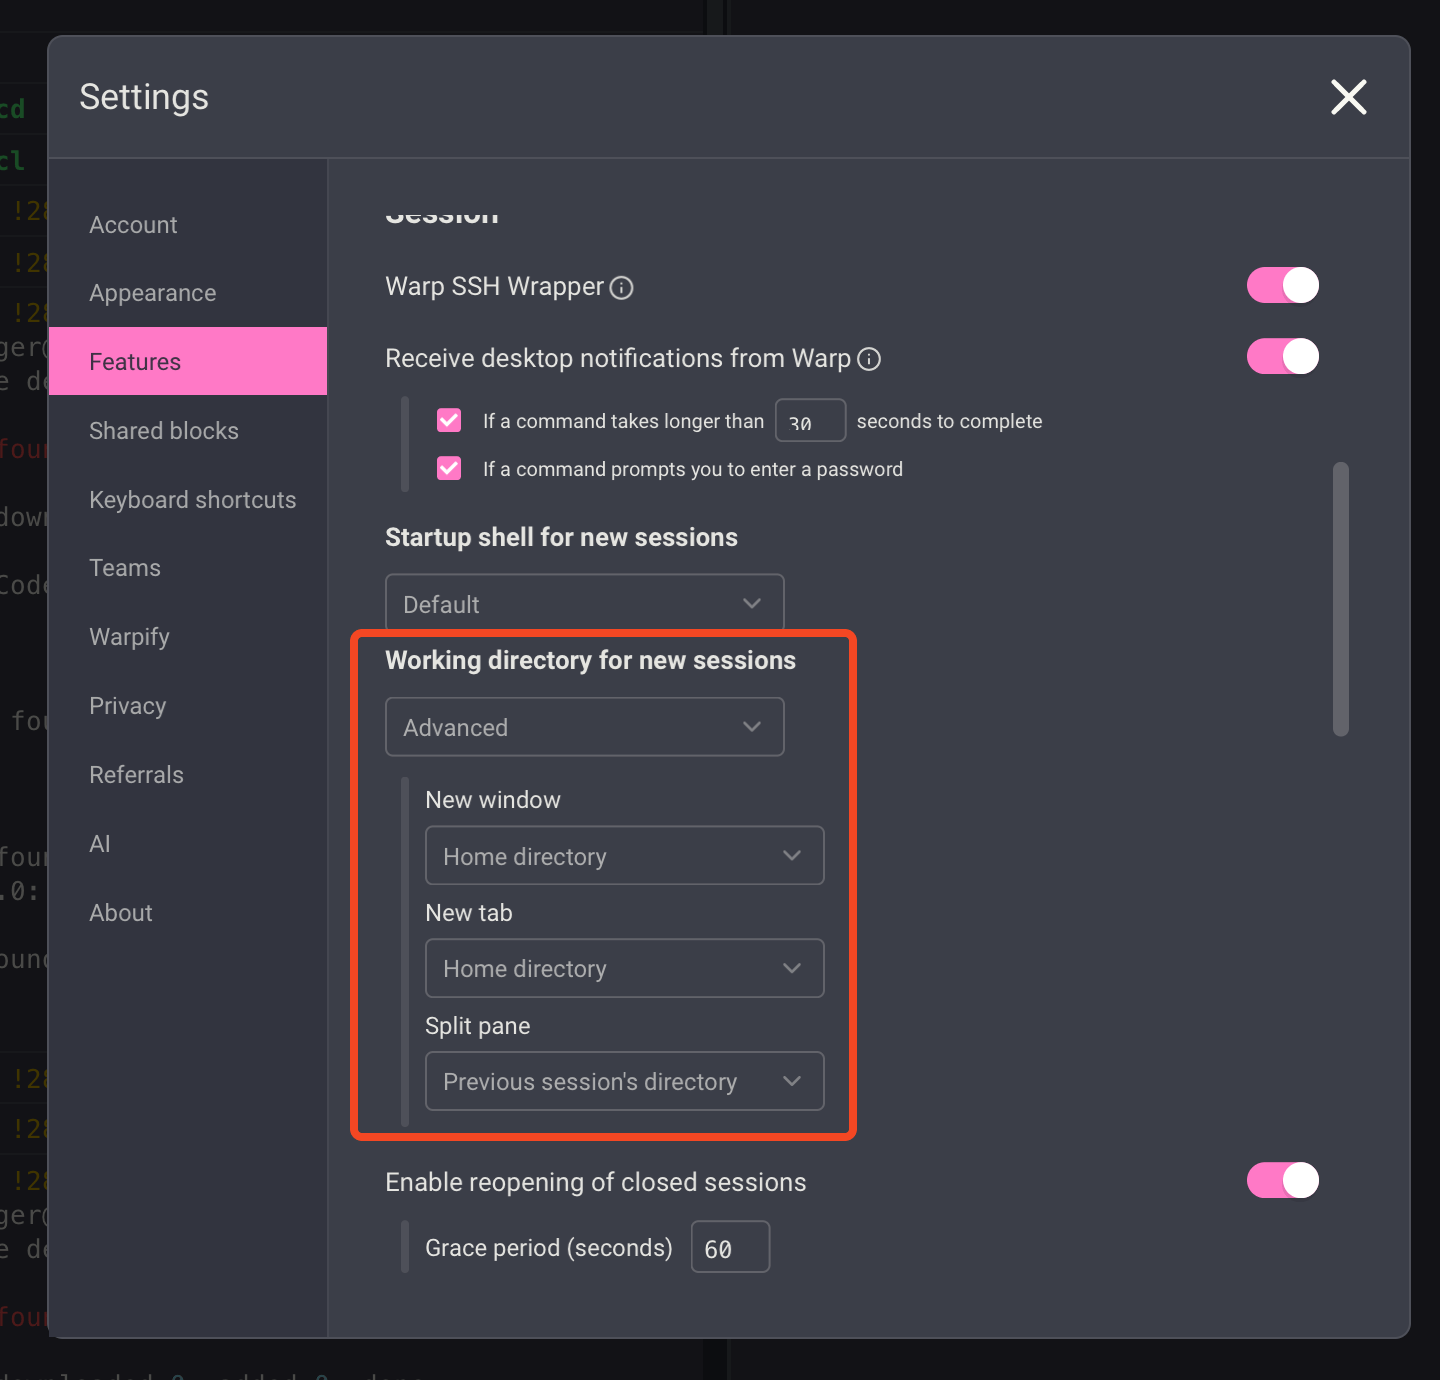
About splitting panes - I’d like to recommend to you the following configuration. In most cases you do splitting to perform something useful in the same directory, but opening f the new tabs and windows in most cases is related to another project or activity.
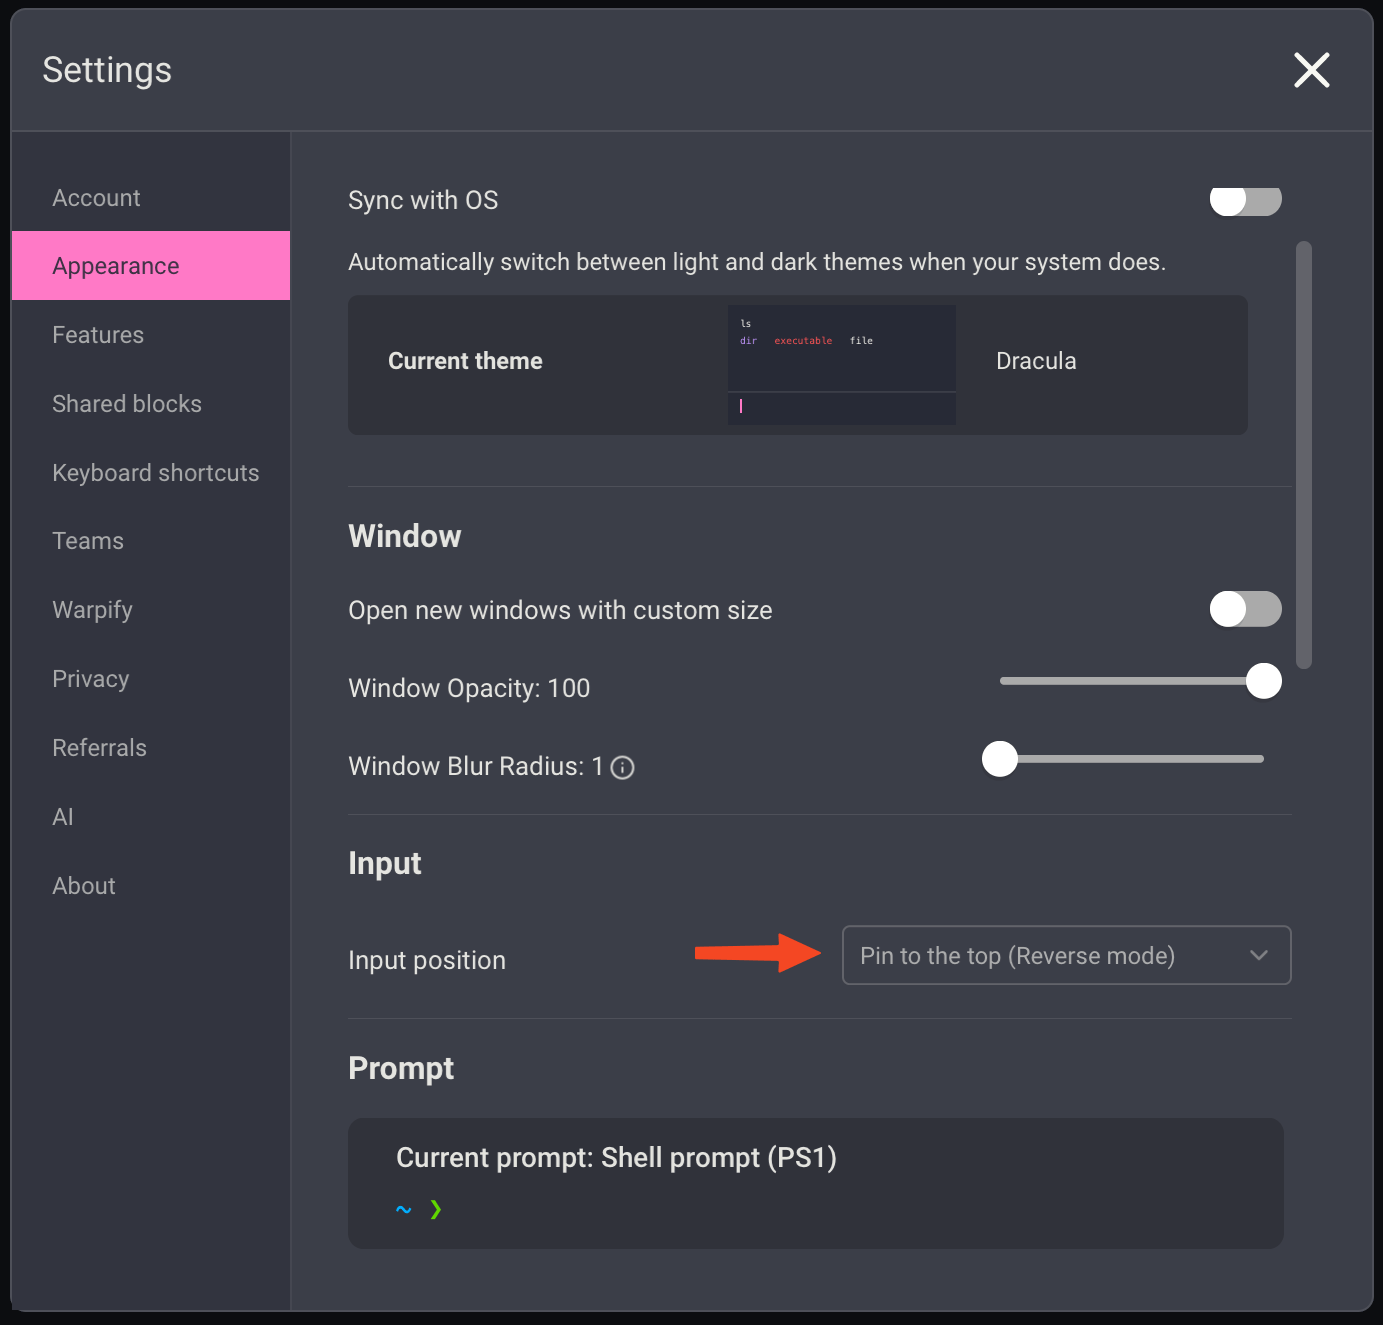
If you like to enter commands from the top of the screen - there is an option for that.
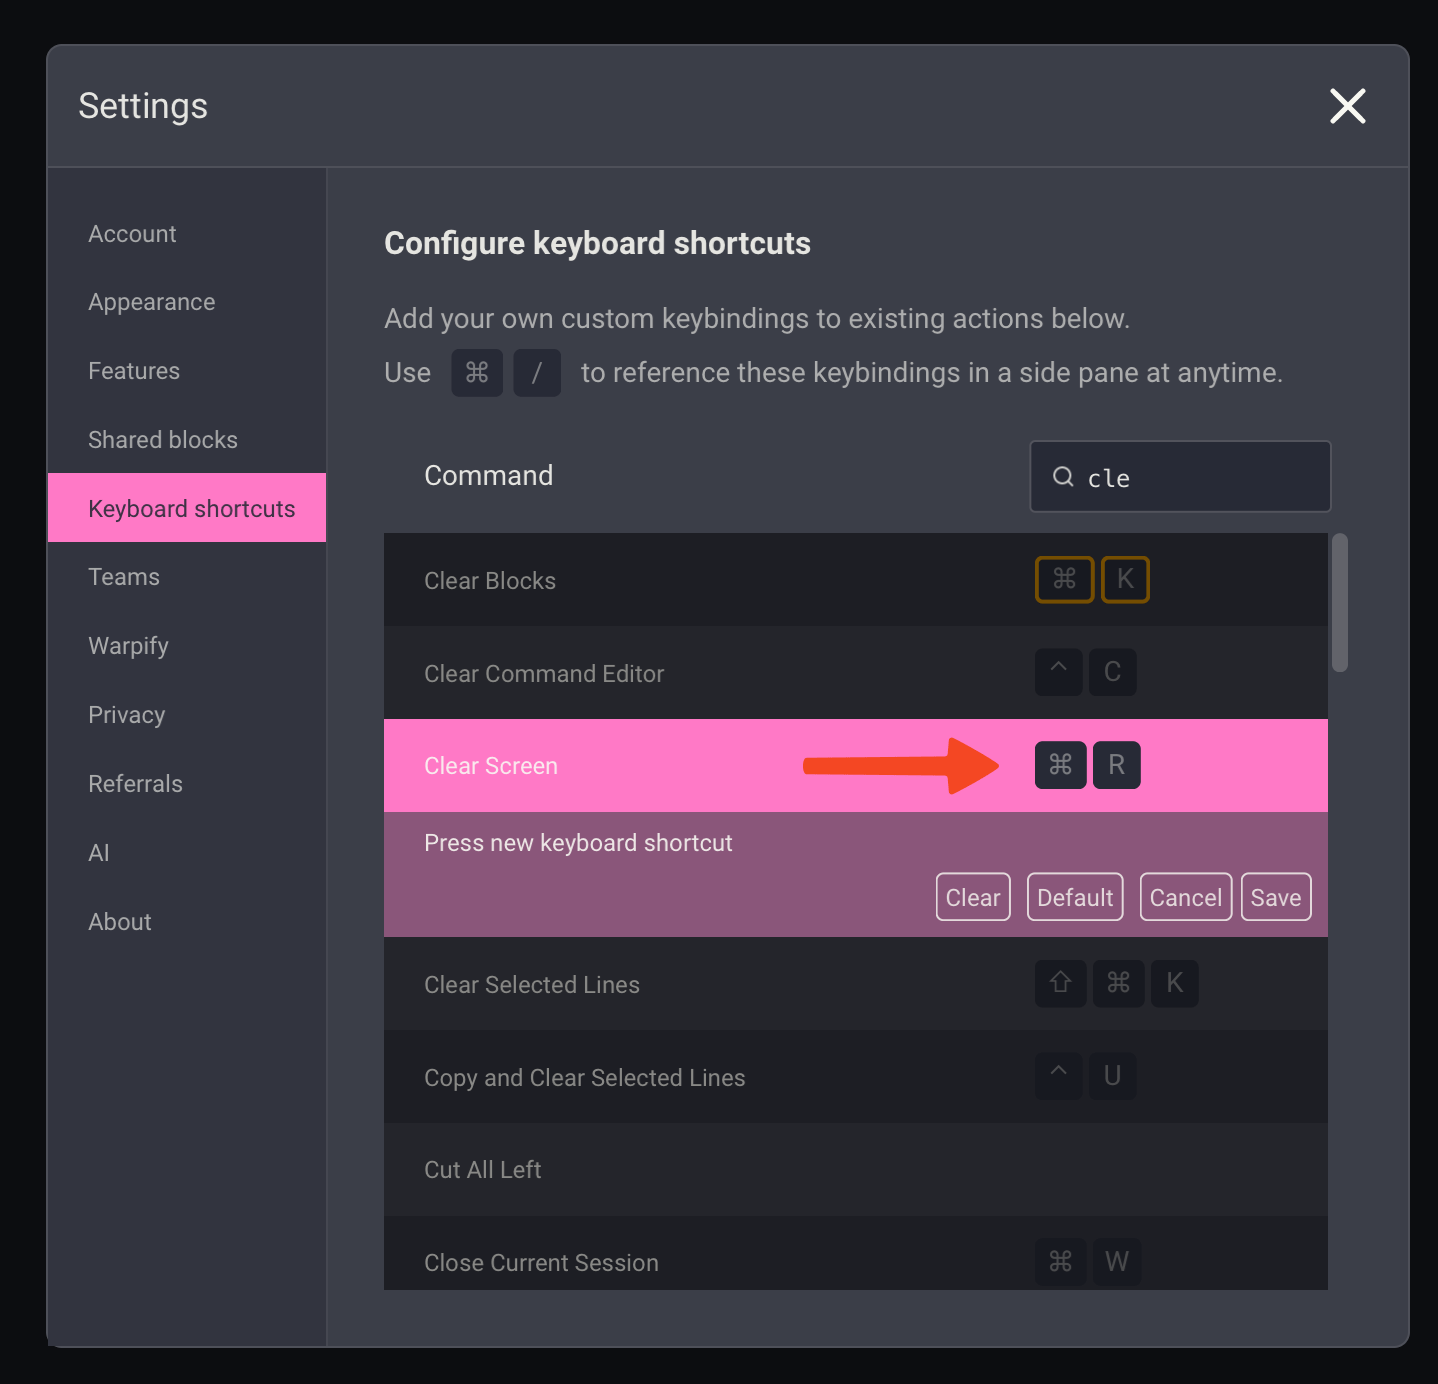
It is useful to have similar keyboard shortcuts in different applications and, fortunately most of the terminals have similar shortcuts. One little tweak - set cmd+r to clear screen.
iTerm2 configuration
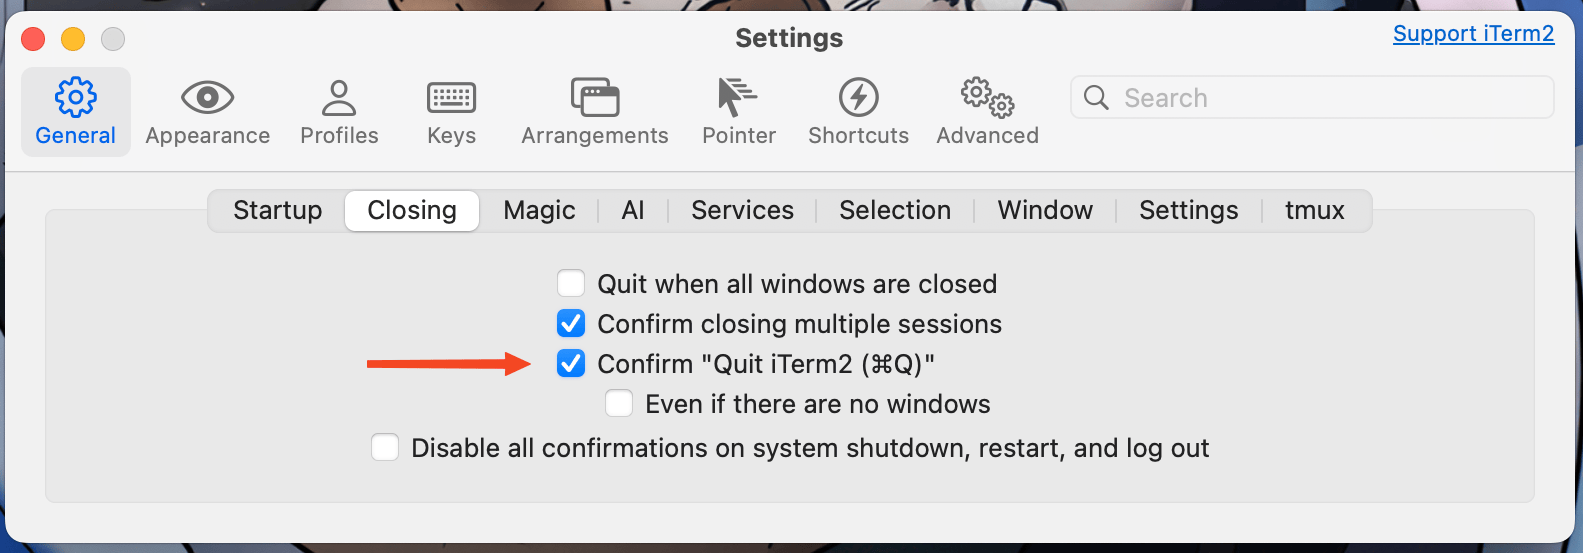
Time to pimp out iTerm2. First of all, let’s check that you’ve enabled the warning before quit option.
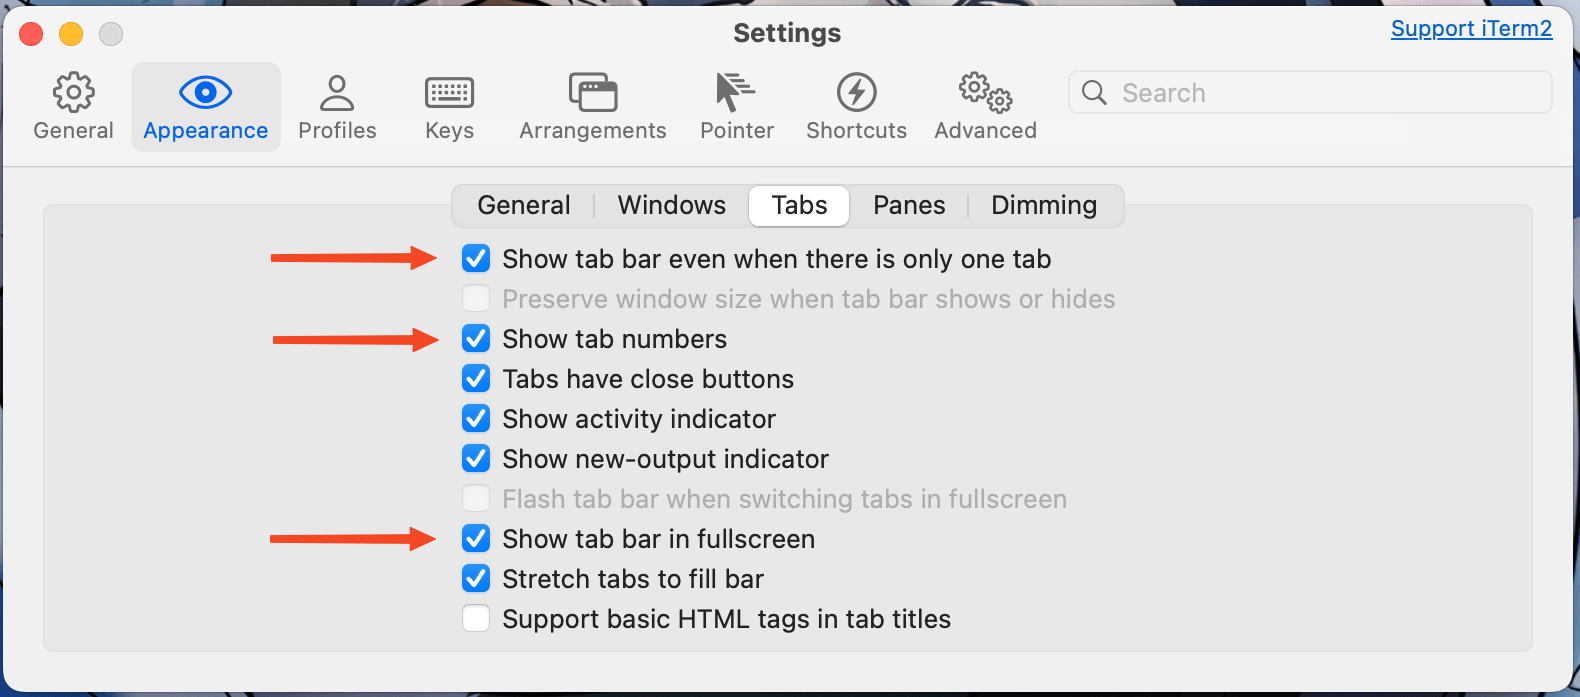
Then let’s configure tabs. Now - tab bar is visible even if there is only one tab open or iterm2 is in full screen mode.
Similar to Warp, we will set MesloLGS NF font for our terminal.
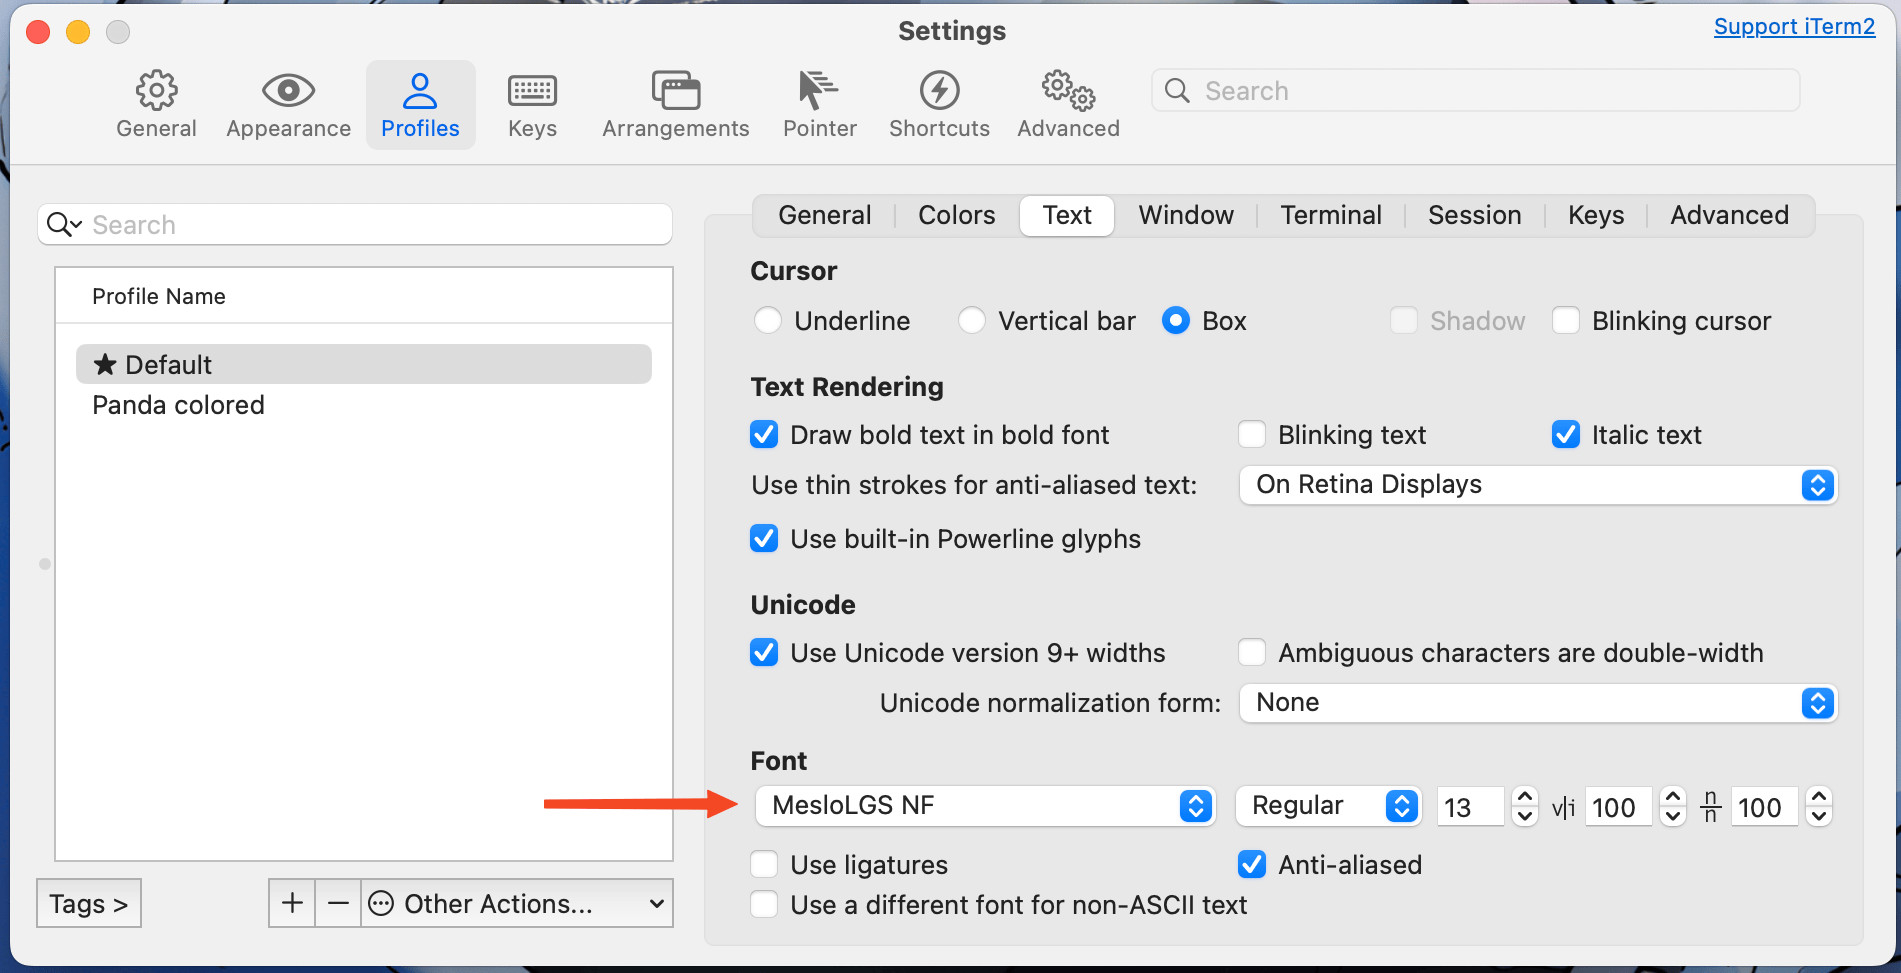
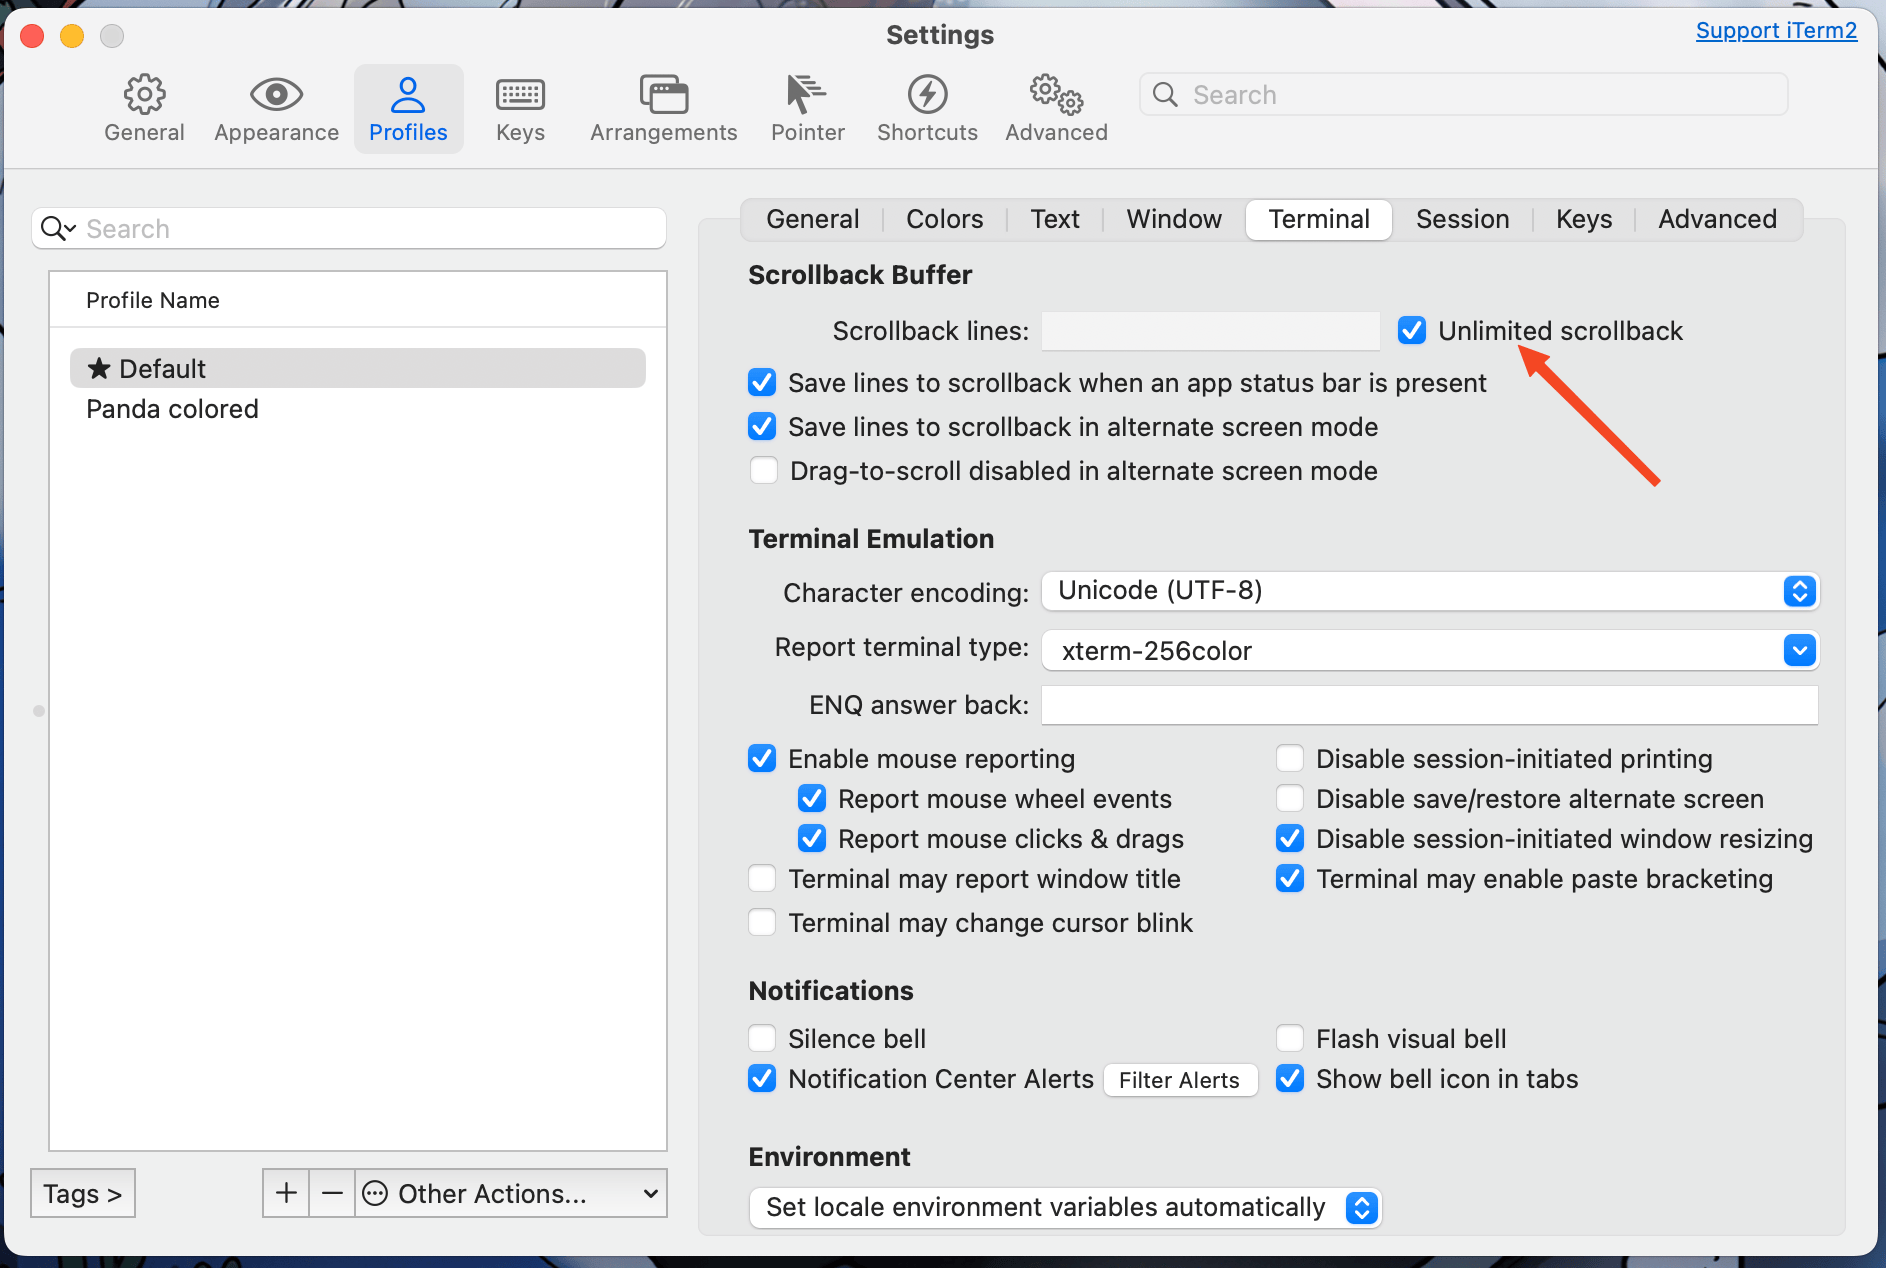
Sometimes it may be required to scroll back to find some text in logs, so we will enable unlimited scrollback.
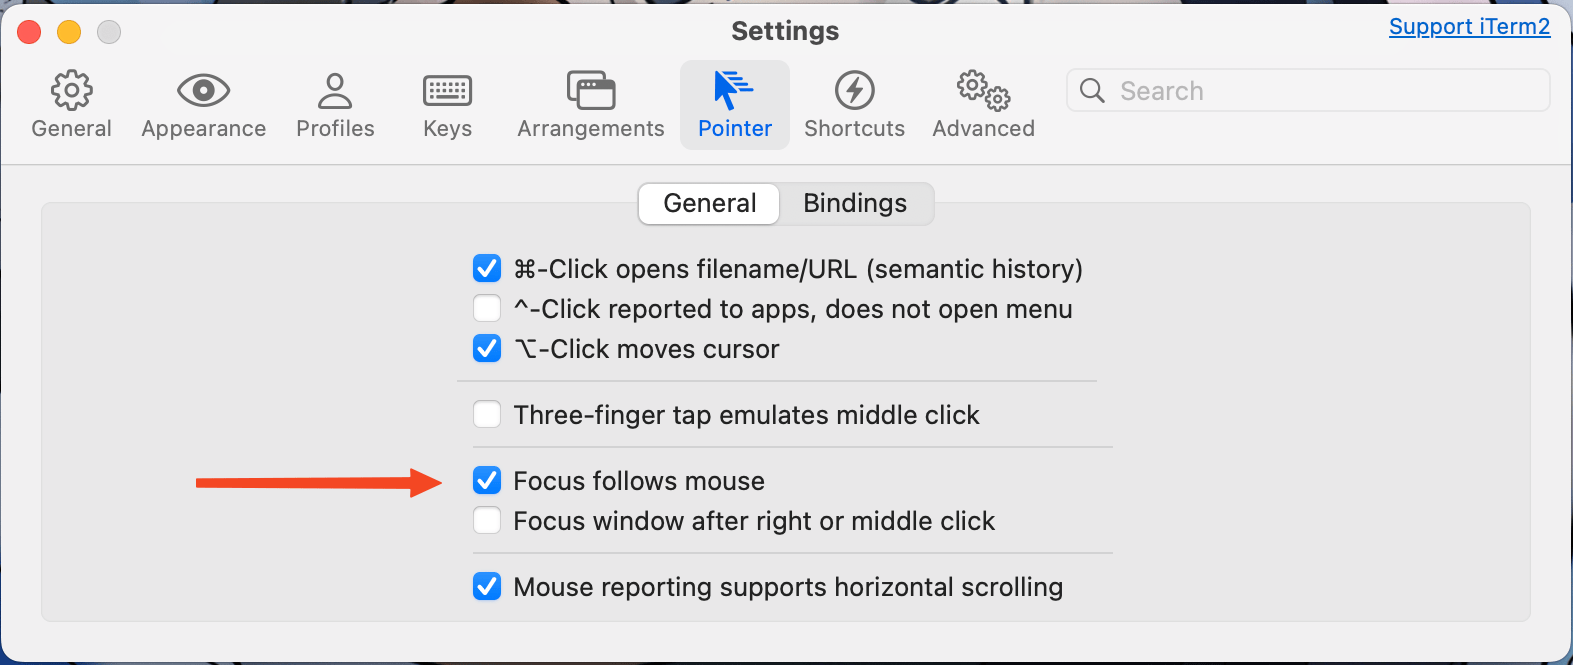
And, similar to Warp, we will enable the follow-cursor feature for split panes.
Package manager
Say hello to HomeBrew, the package manager that makes installing, updating, and managing software a breeze. Get started with
/bin/bash -c "$(curl -fsSL https://raw.githubusercontent.com/Homebrew/install/HEAD/install.sh)"
Once installed, you can do cool things like:
brew install firefox
and uninstall (with cleanup)
brew uninstall google-chrome --zap
--zap key is used to remove associated configuration files from the system. Also, you can search required apps here or using command prompt
brew search firefox
and get package info using
brew info firefox
To supercharge your setup, create a Brewfile. It’s a one-stop list of all your favorite tools and apps. Brewfile may contain following lines
tapis used to fetch information from external package reposbrewis used to install command line utilscaskis used to install apps with graphical interfacemasis used to download and install apps from Mac AppStore
Here’s a quick sample:
tap "oven-sh/bun"

# Develop
brew "act"
brew "ansible"
brew "bun"
brew "fastlane"
brew "gh"
brew "go"
brew "imagemagick"
brew "lefthook"
brew "lnav"
brew "neovim"
brew "node"
brew "openjdk"
brew "orbstack"
brew "pgcli"
brew "pinentry-mac"
brew "pyenv"
brew "python"
brew "rbenv"
brew "redis"
brew "ripgrep"
brew "vips"
brew "yarn"

# System
brew "bat"
brew "chezmoi"
brew "jq"
brew "ffmpeg"
brew "gpg"
brew "fzf"
brew "lsd"
brew "powerlevel10k"
brew "rip2"
brew "speedtest-cli"
brew "ssh-copy-id"
brew "tmpmail"
brew "topgrade"
brew "wget"
brew "xh" # replacement for brew "httpie"
brew "yt-dlp"
brew "zellij"
brew "zoxide"
brew "zsh-autosuggestions"
brew "zsh-syntax-highlighting"

cask "1password-cli"
cask "1password"
cask "alfred"
cask "android-studio"
cask "arc"
cask "bartender"
cask "chatgpt"
cask "claude"
cask "dropbox"
cask "figma"
cask "firefox"
cask "flutter"
cask "folx"
cask "github"
cask "google-chrome"
cask "imageoptim"
cask "iina"
cask "iterm2"
cask "keepingyouawake"
cask "keka"
cask "microsoft-office"
cask "monitorcontrol"
cask "netnewswire"
cask "pearcleaner"
cask "postgres-unofficial"
cask "shottr"
cask "telegram"
cask "textmate"
cask "tower"
cask "typora"
cask "updf"
cask "visual-studio-code"
cask "warp"
cask "zoom"

mas "1Password for Safari", id: 1569813296
mas "DaisyDisk", id: 411643860
mas "DropOver", id: 1355679052
mas "FoxRay", id: 6448898396
mas "Keynote", id: 409183694
mas "LanguageTool", id: 1534275760
mas "Messenger", id: 1480068668
mas "MindNode", id: 1289197285
mas "Numbers", id: 409203825
mas "Outline", id: 1356178125
mas "Pages", id: 409201541
mas "Pixelmator Pro", id: 1289583905
mas "Testflight", id: 899247664
mas "Things", id: 904280696
mas "Transporter", id: 1450874784
mas "Xcode", id: 497799835
Install everything with:
brew bundle
It is my actual Brewfile, so let me tell you about some useful apps, you maybe haven’t heard before
- act - utility to run GitHub actions locally
- fastlane - mobile app deployment tool
- gh - GitHub CLI utility
- lefthook - git hooks manager
- lnav - log file viewer
- orbstack - replacement for Docker Desktop
- pinentry-mac - GPG-utility, used to automate passphrase management on macs
- ripgrep - alternative to system
greputility - bat - alternative to
catutility with syntax highlighting and other useful stuff - chezmoi - dotfiles management tool
- gpg - GNU Pretty Good Privacy tool
- fzf - fuzzy finder, used to search and filter different types of data
- lsd - alternative to system
lsutility with icons, colorized output and other useful stuff - powerlevel10k - zsh theme
- rm-improved - alternative to system
rmcommand - topgrade - automatic upgrade for all installed stuff
- xh - alternative to
curl, fast as hell and friendly like a Spider-Man :) - yt-dlp - audio and video downloader from different sources
- zellij - terminal multiplexer, alternative to
tmux - zoxide - fast filesystem navigation
- zsh-autosuggestions - zsh plugin
- zsh-syntax-highlighting - zsh plugin
Shell and shell prompt
Then, lets setup our shell. I do prefer zsh, but you may choose something else, like fish shell or any other shell.
Let’s improve our zsh experience with Oh My Zsh (OMZ) framework, which contains color themes, plugins and other useful stuff:
sh -c "$(curl -fsSL https://raw.githubusercontent.com/ohmyzsh/ohmyzsh/master/tools/install.sh)"
Another good alternative is a starship shell prompt, but unfortunately we cannot use two or more beautiful shells in one console :)
OMZ installer will create .zshrc file with default OMZ settings.
Next, let’s install powerlevel10k theme:
brew install powerlevel10k
echo "source $(brew --prefix)/share/powerlevel10k/powerlevel10k.zsh-theme" >>~/.zshrc
or using git
git clone --depth=1 https://github.com/romkatv/powerlevel10k.git ${ZSH_CUSTOM:-$HOME/.oh-my-zsh/custom}/themes/powerlevel10k
On the first run it will download all required fonts and ask you to choose look for your shell
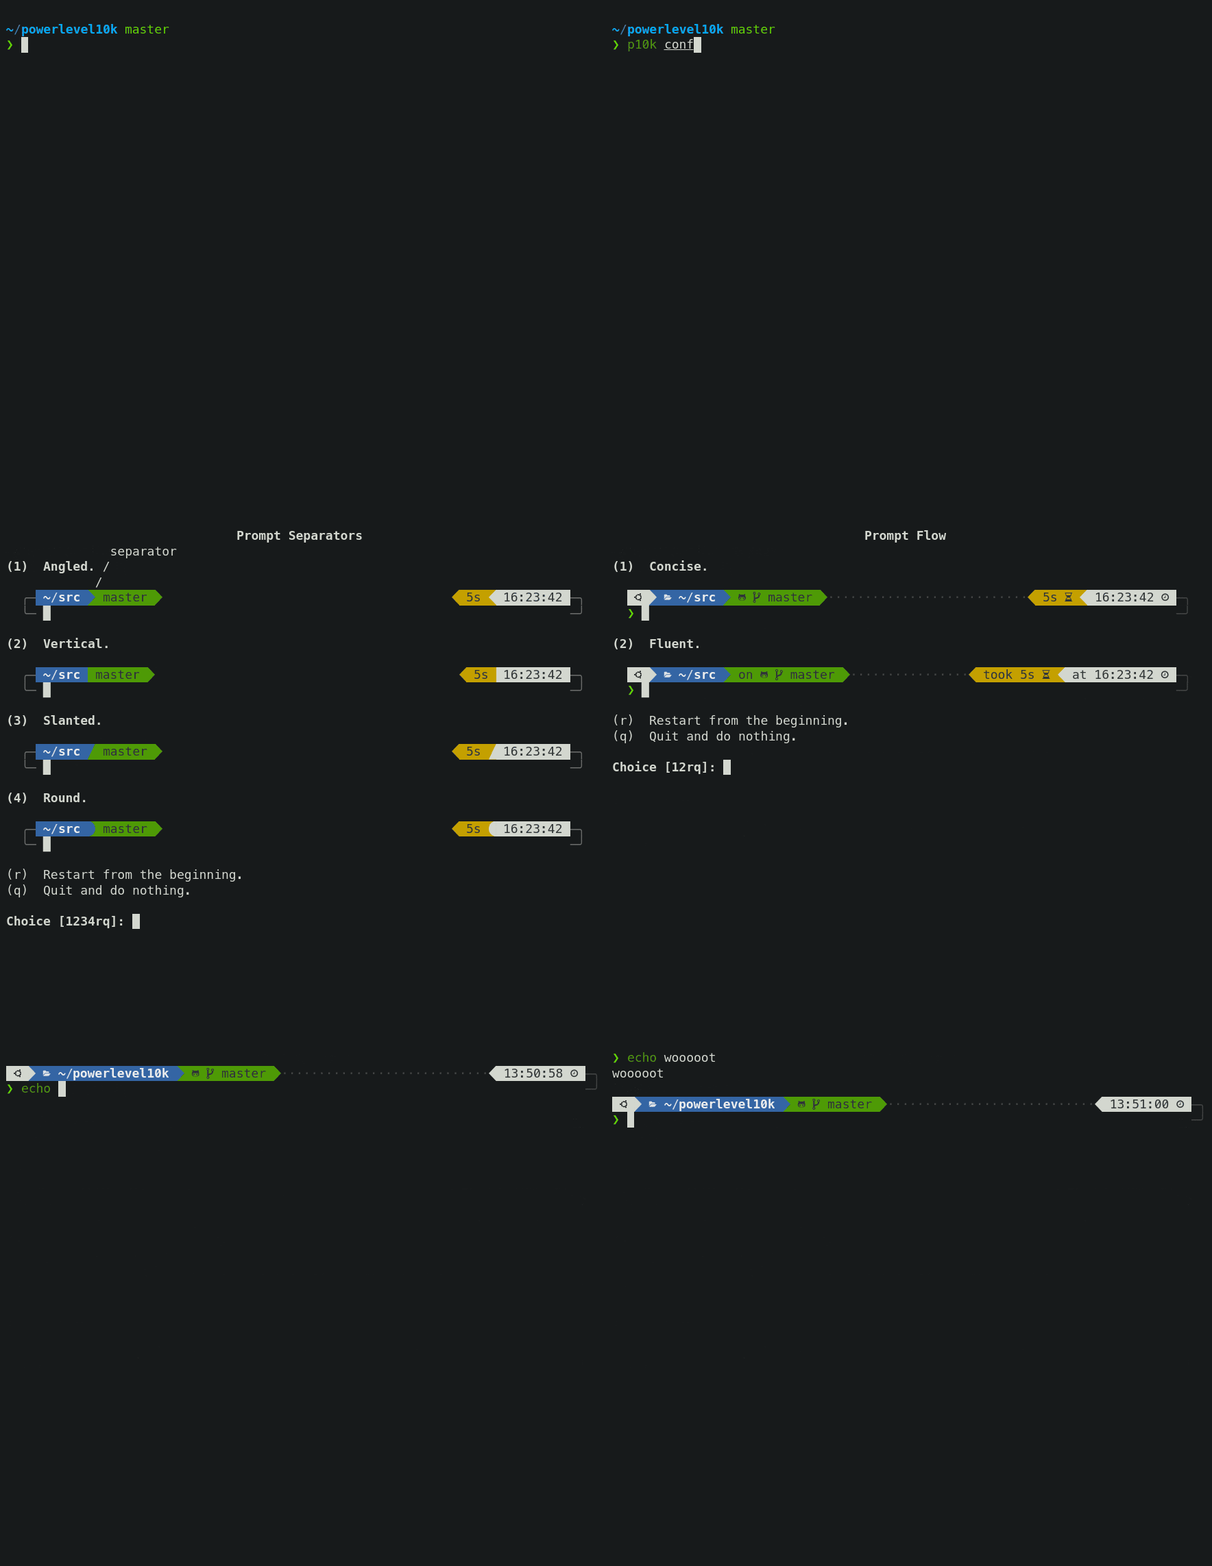
Later, you can change your configuration with following command
p10k configure
Let’s fine-tune our .zshrc file. Here’s mine with comments:
#-- PATH variables for different apps - openjdk, Postgres.app and others
export PATH=$HOME/bin:$HOME/.local/bin:/usr/local/bin:$PATH
export PATH=$PATH:/Applications/Postgres.app/Contents/Versions/latest/bin/
export PATH="/opt/homebrew/opt/openjdk/bin:$PATH"
export PATH=$PATH:$HOME/.cargo/bin

# Path to your Oh My Zsh installation.
export ZSH="$HOME/.oh-my-zsh"

#-- zsh plugins - command line completitions, aliases, etc
plugins=(brew bun bundler docker docker-compose flutter fzf gem genpass git pip python rails rbenv ruby ssh-agent vscode zoxide zsh-interactive-cd)

source $ZSH/oh-my-zsh.sh

# User configuration

#-- Some plugins, which we've installed before using Homebrew - fish-style suggestions and powerlevel10k theme
source /opt/homebrew/share/zsh-autosuggestions/zsh-autosuggestions.zsh
source /opt/homebrew/share/zsh-syntax-highlighting/zsh-syntax-highlighting.zsh
source /opt/homebrew/share/powerlevel10k/powerlevel10k.zsh-theme

# powerlevel10k config
source /opt/homebrew/share/powerlevel10k/powerlevel10k.zsh-theme

# To customize prompt, run `p10k configure` or edit ~/.p10k.zsh.
[[ ! -f ~/.p10k.zsh ]] || source ~/.p10k.zsh

# required for gpg
export GPG_TTY=$(tty)

# Preferred editor for local and remote sessions

if [[ -n $SSH_CONNECTION ]]; then
  export EDITOR='vim'
else
  export EDITOR='nvim'
fi

# Aliases

alias zshconfig="nvim ~/.zshrc"
alias reload!="omz reload" #-- command to reload config after changes
alias cl="clear"
alias zj="zellij"
alias cp="cp -R"

# ssh
alias sshpub="cat ~/.ssh/id_rsa.pub | pbcopy" #-- when I need to share my ssh public key
alias sshconfig="nvim ~/.ssh/config" #-- when I need to edit my ssh config

# nvim
alias n="nvim"

# lsd
alias l='lsd -1a'
alias la='lsd -lha'
alias ls=lsd

# homebrew
alias buz="brew uninstall --zap"

# bat
alias cat='bat --paging=never --style=plain'

# pnpm
alias pm="pnpm"
alias px="pnpx"
alias pnx="pnpm nx --"
alias pmu="pnpm up"
alias pmi="pnpm install"
alias pmd="pnpm run dev"

# rails related aliases
alias bbu="bundle update && bun update"
alias byu="bundle update && yarn upgrade"
alias rdcm="rails db:drop && rails db:create && rails db:migrate"
alias kamal='docker run -it --rm -v "${PWD}:/workdir" -v "/run/host-services/ssh-auth.sock:/run/host-services/ssh-auth.sock" -e SSH_AUTH_SOCK="/run/host-services/ssh-auth.sock" -v /var/run/docker.sock:/var/run/docker.sock ghcr.io/basecamp/kamal:latest'

alias node_clean="find . -name 'node_modules' -type d -prune -print -exec rm -rf '{}' \;" #-- when I need to remove node_modules directories
alias log_clean="find . -name '*.log' -type f -prune -print -exec rm -rf '{}' \;" #-- when I need to cleanup log-files


alias gitt="gittower ." #-- used to run Tower.app

# nvm
export NVM_DIR="$HOME/.nvm"
[ -s "/opt/homebrew/opt/nvm/nvm.sh" ] && \. "/opt/homebrew/opt/nvm/nvm.sh"  # This loads nvm
[ -s "/opt/homebrew/opt/nvm/etc/bash_completion.d/nvm" ] && \. "/opt/homebrew/opt/nvm/etc/bash_completion.d/nvm"  # This loads nvm bash_completion

# bun completions
[ -s "/Users/alec/.bun/_bun" ] && source "/Users/alec/.bun/_bun"

# pnpm
export PNPM_HOME="$HOME/Library/pnpm"
case ":$PATH:" in
  *":$PNPM_HOME:"*) ;;
  *) export PATH="$PNPM_HOME:$PATH" ;;
esac
# pnpm end
Chezmoi
Chezmoi allows you to backup/restore and sync your dotfiles across all your devices. It works fine with topgrade, so every time you update all your packages - you’ll update your dotfiles.
I think you’ve installed Chezmoi with Homebrew, but if not - there’s an instruction for that.
After installation, you need to initialize chezmoi using
chezmoi init
Now you can add your dotfiles using
chezmoi add ~/.zshrc
When you’ve finished adding files, you need to visit chezmoi directory ~/.local/share/chezmoi with
chezmoi cd
and put all files under git.
git add .
git commit -m "Initial commit"
Then you need to create git repository with your GitHub or GitLab account and push your changes
git remote add origin git@github.com:$GITHUB_USERNAME/dotfiles.git
git branch -M main
git push -u origin main
After that, you can return to your working directory with
exit
GPG
Last thing I’d like to tell you about is a GPG, GNU Pretty Good Privacy tool. You can use it to sign your commits and emails, encrypt and decrypt data.
WARNING: DO NOT PUT YOU
.gnupgDIRECTORY UNDER CHEZMOI TO AVOID SECURITY ISSUES!!!
Firstly, we need to create our first private key
gpg --gen-key
You’ll be asked for your name and email
gpg (GnuPG) 2.4.6; Copyright (C) 2024 g10 Code GmbH
This is free software: you are free to change and redistribute it.
There is NO WARRANTY, to the extent permitted by law.

gpg: directory '/Users/alec/.gnupg' created
Note: Use "gpg --full-generate-key" for a full featured key generation dialog.

GnuPG needs to construct a user ID to identify your key.

Real name: Alexey Poimtsev
Email address: alec@alec-c4.com
You selected this USER-ID:
    "Alexey Poimtsev <alec@alec-c4.com>"

Change (N)ame, (E)mail, or (O)kay/(Q)uit?
and after that - for secure passphrase to protect your key.
To view your keys, you can use the following command
gpg --list-keys
You’ll see something like
gpg: checking the trustdb
gpg: marginals needed: 3  completes needed: 1  trust model: pgp
gpg: depth: 0  valid:   1  signed:   0  trust: 0-, 0q, 0n, 0m, 0f, 1u
gpg: next trustdb check due at 2027-11-30
[keyboxd]
---------
pub   ed25519 2024-11-30 [SC] [expires: 2027-11-30]
      57CFFC30D9C385EB637A9A17117803DB62CCA5D1
uid           [ultimate] Alexey Poimtsev <alec@alec-c4.com>
sub   cv25519 2024-11-30 [E] [expires: 2027-11-30]
To export your secret key (e.g. for backup) we need to do the following:
- Find your secret key id
$ gpg --list-secret-keys
[keyboxd]
---------
sec   ed25519 2024-11-30 [SC] [expires: 2027-11-30]
      0000000000000000000000000000000000000000
uid           [ultimate] Alexey Poimtsev <alec@alec-c4.com>
ssb   cv25519 2024-11-30 [E] [expires: 2027-11-30]
Where 0000000000000000000000000000000000000000 is your secret key id.
- Export key to the file
gpg --export-secret-keys --armor 0000000000000000000000000000000000000000 > ~/my-priv-gpg-key.asc
- Store your key to secure space
Later, to restore your key you can use following command
gpg --import ~/my-priv-gpg-key.asc
Sign git commits with GPG
The last step is to configure your git client to sign git commits using GPG. Earlier we’ve installed pinentry-mac program using homebrew, let’s add it to GPG config
echo "pinentry-program $(brew --prefix)/bin/pinentry-mac" > ~/.gnupg/gpg-agent.conf
To ensure that changes were applied, let’s restart GPG agent using
killall gpg-agent
Remember, earlier we saw our key 0000000000000000000000000000000000000000. We need to export our public key to add it to GitHub or any other platform.
gpg --armor --export 0000000000000000000000000000000000000000
You’ll see something like
-----BEGIN PGP PUBLIC KEY BLOCK-----

0000000000000000000000000000000000000000000000000000000000000000
0000000000000000000000000000000000000000000000000000000000000000
0000000000000000000000000000000000000000000000000000000000000000
0000000000000000000000000000000000000000000000000000000000000000
0000000000000000000000000000000000000000000000000000000000000000
0000000000000000000000000000000000000000000000000000000000000000
0000000000000000000000000000000000000000000000000000000000000000
0000000000000000000000000000000000000000000000000000000000000000
0000000000000000000000000000000000000000000000000000000000000000
00000000000000000000000000000000000000000000
00000
-----END PGP PUBLIC KEY BLOCK-----
You can upload this public key to GitHub here.
Configure git to use GPG with our key to sign all commits
git config --global gpg.program $(which gpg)
git config --global gpg.format ssh
git config --global commit.gpgsign true
git config --global user.signingkey 0000000000000000000000000000000000000000
and let’s check how its work
git commit -S -s -m "My Signed Commit" --allow-empty
Finally, your ~/.gitconfig will look like
[filter "lfs"]
	clean = git-lfs clean -- %f
	smudge = git-lfs smudge -- %f
	process = git-lfs filter-process
	required = true
[user]
	name = Alexey Poimtsev
	email = alec@alec-c4.com
	signingkey = 0000000000000000000000000000000000000000
[init]
	defaultBranch = master
[pull]
	rebase = true
[alias]
	cgl = config --global --list
	l = log --graph --pretty='%Cred%h%Creset -%C(auto)%d%Creset %s %Cgreen(%ad) %C(bold blue)<%an>%Creset' --date=short
[commit]
	gpgsign = true
[gpg "ssh"]
	allowedsignersfile = /Users/alec/.ssh/allowed_signers
	program = /Applications/1Password.app/Contents/MacOS/op-ssh-sign
[gpg]
	program = /opt/homebrew/bin/gpg
Useful hacks
Expired GPG key
You can easily renew your key
gpg --edit-key 0000000000000000000000000000000000000000
then
gpg> expire
(follow prompts)
gpg> save
or simply
gpg --quick-set-expire 0000000000000000000000000000000000000000 1y
where 1y is amount of years. There are some other options:
Send keys to public keyservers
gpg --keyserver keys.openpgp.org --send-keys 0000000000000000000000000000000000000000
gpg --keyserver pgp.mit.edu --send-keys 0000000000000000000000000000000000000000
Then you can find your keys https://pgp.mit.edu